Paint Negative Shapes and Spaces

So, you’ve chosen a subject and got some idea of a composition. You’ve decided on a sensible painting size and surface, set up your working area properly and chosen a suitable paintbrush. If you’ve read the Colour Guide you should have prepared your imprimatura (your ground) and have, ready mixed, the colour you’re going to start with. It’s finally time to start! How are you going to paint the key ‘lines’ in all the right places?

I emphasise the word ‘lines’ because often artists do not really think of lines, rather ‘boundaries in tone’. This may sound fussy, but while there are some, extremely talented, artists who can simply paint boundary lines and get them all perfectly in the correct place first time, a lot of artists can’t. This does not, however, stop them from painting fantastic paintings. To help them judge the position of a boundary and give them leeway to make the odd mistake or two without it mattering, professional artists often use another insurance policy called Negative Shaping or Negative Space.
But what is a Negative Shape?
Negative shaping works on the principle that an artist’s human eye finds it much easier to judge volume correctly than it does the exact shape or curve of a line. So if you don’t paint a line, but instead a large block of colour, then you can assess the boundary of that block of colour fairly easily. Also, if you start by painting that block of colour in a very safe place, fairly far to one side of where you are confident the final boundary is going to fall, you can fiddle with that boundary to your heart’s content and even practice it a few mm’s to one side before filling the practice one in and bringing it down to the correct location. I realise this is not easy to visualise so I’ve painted a demo / demonstration as well.
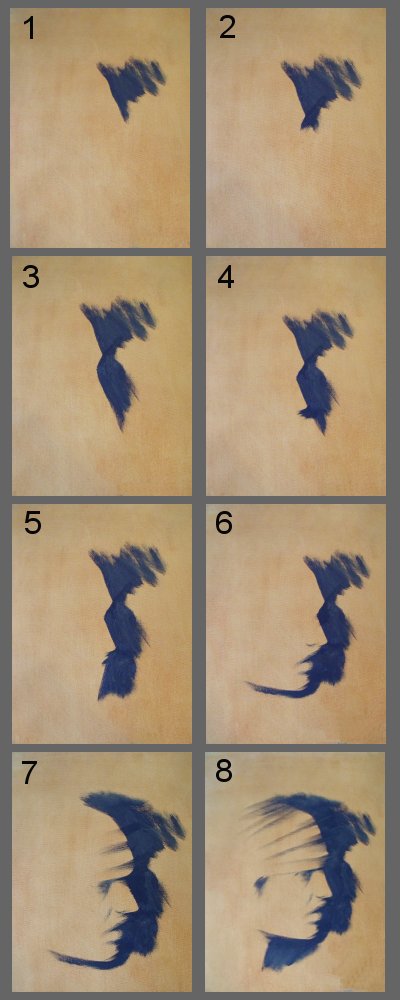
Negative shaping / space demonstration
Here I have prepared an imprimatura by priming the canvas with white acrylic paint and then applying a thin glaze of burnt Sienna. This gives a very convincing, radiant, fast drying, skin tone (which unfortunately the camera does not do justice to). Then I mixed a cool blue grey colour with which I am going to ‘chisel out’ or ‘Negative Shape’ a silhouette. I want the silhouette to be fairly central on my canvas, so with a large brush I start well to the right and, keeping my brush on the canvas, I start to rub paint back towards the place where I want the boundary to be (step 1), all the time looking at the angle of the boundary on my subject and cross checking it against what I am reproducing. By the time I get to where the final boundary is going to be I have actually practiced the angle of the line several times. I can also concentrate purely on the angle without worrying about the length either. The line can initially be far longer than it needs to be. It doesn’t matter, because I am negative shaping – filling in the external space. I can just chop into it and reduce it to the correct length with my next brush stroke. I have done this with the nose in step 3. I have concentrated on the angle of the nose (and purposely painted it too long). Then in step 4 I cut the nose down to the correct length. The real value of painting negative shapes comes towards the end though. After step 7 I decided that I had made the nose too large and receded the forehead too rapidly, but it's not a problem, I simply chisel a bit more off the front of the forehead and the nose to take them back a bit and no-one will ever know that I made the mistake!
In reality artists who use this approach will probably paint layers of negative
shaping over the top of each other. For example, prepare a fairly dark
coloured imprimatura. Then, using a skin half tone, negative
shape the area of an eye socket that is in shadow (i.e. all that is
left of your dark imprimatura is that which is inside the shadowy area
of the eye). As long as you keep the skin half tone fairly thin you
can spread it way outside the area that will ultimately be your model’s
face and then take a very cool colour to negative shape the facial
profile out of that.
Painting Positive Shapes
Once you have mastered negative shaping have a go at positive shaping too (i.e. you start well inside the shape and work outwards to its edges). It’s also pretty easy, but with positive shapes you do have to get the length and the angle correct at the same time. Before becoming a portrait artist I used to paint murals on children’s bedroom walls. I would often be presented with a situation where I had to paint a character onto a wall for which the client no longer had the original paint colour. This meant that if I made a single mistake outside the area of the character I did not have an exact colour match with which to correct it. I knew that I would never manage to mix an identical colour
to cover up an error and the result would look really, really unprofessional. I simply couldn’t risk it. So what did I do? I positive shaped all the time. I could make as many mistakes as I liked inside the design area but never, never outside it.
Negative shape when you are sketching too
You can use negative and positive shaping when you are sketching too. Just angle your pencil so that it is fairly flat against the paper. This will give a nice broad mark with which you can chisel away at your silhouette.
Painting Lost and Found Edges
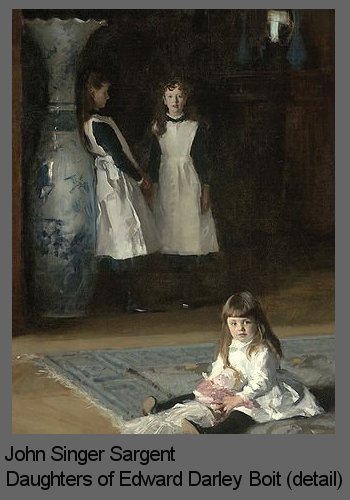
Some artists obviously don’t paint tonally and/or use negative shapes as I have described. They use line as an integral part of their style (and I have tremendous respect for them), but for those of you who do work by assessing boundaries in tone, the next logical lesson after learning to negative and positive shape is actually ascertaining when not to. By this I mean that if there is no boundary in tone or colour (even if you brain knows that there are actually two objects in juxtaposition) then don’t paint one in. Look at this portrait by John Singer Sargent. Notice the absence of a significant boundary between the central girl’s arms and the dark background. Her hands and her hair sitting slightly on her shoulder are all that are needed to confirm that her arms are there and you don’t question there absence at all. Sometimes all you need is a tiny mark to indicate a boundary. This is called using ‘Lost and Found edges’.
Summary
Negative shaping is one of the key tools in the armoury of a professional artist, portrait or otherwise, to help combat the fact that all humans make mistakes. It is an important trick of the trade and well worth pursuing. If it suits your style not to use line, remember to always assess whether a boundary is necessary – i.e. try to use lost and found edges.
Copyright Fiona Holt, 2024