Painting A Likeness

Painting a likeness is the ultimate goal and test for the portrait artist. For me the challenge is all part of the fun and I am sure this inspires many other portrait painters too. With any other subject the margins for error are far greater than for the portrait. One tiny inadvertent slip of the brush and you've portrayed the frog rather than the prince!
I’d be lying if I said painting a likeness was easy though. It’s not. So where do you start? Well, there are all sorts of checks and balances that portrait painters know and use regularly as guides throughout a painting, and I have introduced the ones I find most useful below, but the truth is that I managed to paint convincing portraits before I knew any of these rules. Not because I was born with it (as some artists might have you believe!), but simply because I practiced. Finding a likeness is all about taking your powers of observation to the next level and observation, like any other skill, can only be developed by dedication. Someone once told me ‘paint what you see and not what you think you see’, and to a certain extent you do have to. For example, below I will tell you that, as a rough guide, the space between the eyes is approximately the same as the width of each eye. But turn the head slightly and this guide no longer holds true. The dimensions of the face constantly alter as the head moves and it would be ridiculous to suggest that you should remember a complete set of rules for every position of the head. So there is no substitute for honing your observational skills and relying on your confidence in them as you paint.
However, with all that said, it is also useful to already know what you should be seeing and then to look and check whether you actually are. I may well have developed my powers of observation enough to paint a convincing portrait without a knowledge of common facial proportions, but it would be fair to say that now I do know them I have become a more consistent portrait artist.

Links I love ...
I publish a basic sketch book on Amazon to help pay the bills. It's very reasonably priced at $6.98 and gets good reviews.
(If you're not in the USA, paste the code below into the search box of your preferred Amazon site).
1519204795
My friend, Pierre, does the most amazing furniture and antique restoration.
Visit his site and browse a while to see the magic he can work!
There are two levels of achievement to aspire to. The first is getting your portrait painting to look convincingly human and the second is getting an actual likeness of the person sitting in front of you. If you’re not doing a portrait commission, don’t get down on yourself about the likeness part; it will come. Remember that when your portrait is hanging in an exhibition no one knows what the person actually looked like. All you may see is a compilation of errors in likeness, but your viewers won’t see that at all. They will, however, spot it if your portrait doesn’t look human!
Some key dimensions of the human form in front profile
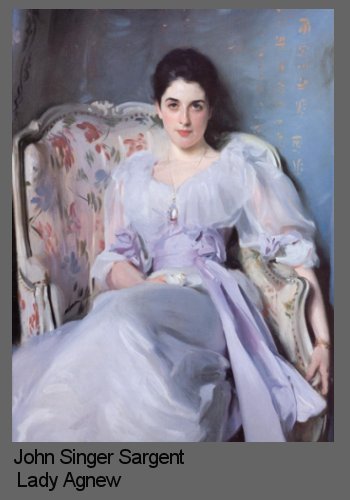
I have used a portrait by one of the greats (as far as I am concerned), John Singer Sargent, as an aid to demonstration here. Have a mirror at hand while you read this section If you can; it will help to reinforce it.
The face
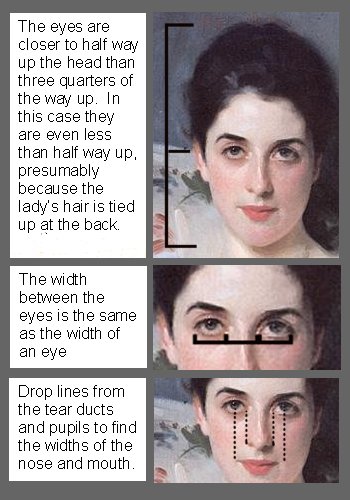
1. The eyes are located approximately half way up the full height of the head (including the hair), not three quarters of the way up as most people imagine. This means that the forehead is larger than most people think unless the head is tilted backwards. The tilt of the head strongly affects the volume of the forehead.
2. Regardless of how large the eyes are, as a rough guide the width between the eyes is approximately the same as the width of a single eye.
3. The white of the eye only fully surrounds the iris if a person opens their eyes as wide as possible (in e.g. a look of astonishment). Usually, the iris is cut into by the eye lid.
4. The whites of the eyes are rarely pure white, but the lit side of the whites (which may sometimes have a dab of pure white in it) will be on the same side of the face as the light source. The iris however, is most lit up on the side furthest away from the light source because the light enters into it and reflects off the far side.
5. Dropping vertical lines down from the tear ducts will guide you to the two edges of the nose.
6. Find the extent of the mouth widthways by dropping vertical lines down from the pupils.
7. The ears are larger than most people think. The top of the ear may be as high as the level of the eyebrow and the ear lobe may come as low as the bottom of the nose. However, be aware that this will alter drastically as the head is tilted upwards or downwards.

8. The bottom lip lies about halfway between the base of the nose and the
end of the chin. You will find that there are certain errors that you
make repeatedly. Mine is that I often make the space between the top
of the lips and the base of the nose too large. I have heard other
portrait artists say the same, so watch out for this. The whole face
inevitably becomes too long and you end up with a horse face.
9. Think of the eyes, nose and mouth as linked. Do not regard them as
individual features to be painted separately, but look for lines that
link them.
The Body
1. The hands are as large as the face. Hold one hand up to your face now and you will find you can cover it entirely.
2. If the arms are allowed to hang down besides the body, they will reach much further than most people think. The finger tips will reach to a point approximately half way between the hips and the knee.
3. The pubic bone is approximately half way up the body, not the navel.
There are lots more body proportions I could continue to list, but probably at the risk of your eyes glazing over (if they haven’t already), so instead I will give you the standard recommendation guide of using the unit of a single head length to check all the body proportions of your model. You will find that children have proportionally larger heads than adults.

Getting a likeness
1. The tilt of the bottom of the nose varies a lot from person to person. Always check to see how much of the model’s nostrils you can see (or indeed whether you can actually see them at all). If you can, concentrate on their shape which also varies a lot from person to person.
2. The shapes of both the eyebrow and the eyelid are quite distinguishing features, as is the boundary between the upper and lower lips.
3. Age is a very distinguishing feature. We all know what ages us. Wrinkles appear around the eyes, the corners of the mouth and the forehead, and the natural crease in the skin, which links the edges of the nose to the corners of the mouth, becomes deeper. The skin becomes loose and tends to hang slightly off the jaw bone.
Treat these features with great care. Get them correct and you will have a convincing likeness, get them a millimetre too long and you will age your model by 10 years or more. Young children are often much harder to paint because these features are limited or absent. Don’t look for features and tonal changes to paint that are not there. A tip for painting children is to put them in setting so that there are plenty of other things of interest to paint. That way you will be happier to leave the face alone.

Where to start painting
Finding a way into a portrait painting can be difficult. When I was learning I went to many portrait demonstrations and it was always interesting to observe how the artists got started. Most like to sketch in the outline of the shape of the face in thinned paint and, before going into any detail, to mark the position of key points of the body in relation to it. This is perhaps the most established way but by no means the only way. The problem I find with it is that if I paint the outline first and than I put the eyes, nose and mouth on afterwards, they have a tendency to look slightly stuck on. I prefer to start by either negative shaping or blocking in the shadowy area of one of the eyes and then to rapidly build outwards, particularly to the profile on the same side of the face, constantly checking angles and volumes in relation to that initial eye.
The downside of this approach is making sure you get the
eye the right size in the first place. If you are not careful you can
end up doing huge portraits of oriental people (who tend to have quite small eyes) and tiny portraits of
afro-carribean people (who tend to have quite large eyes).
Another portrait painting approach that I have come across worked on the basis that a circle is always a circle whereas an oval (the approximate shape of a human face) can vary hugely and is therefore prone to errors. The artist therefore looked for an imaginary circle in the model’s face, sketched in a circle of the correct size on her painting and then gradually adjusted and added to it. I found that this worked quite well, but that I had trouble finding a circle as easily as she did. My advice is to give all these approaches a try; what works for me may not necessarily work for you.

Summary
Knowing the dimensions of the human form and face is extremely important to guide a portrait artist towards painting a likeness, but there is no substitute for developing your observational skills. Try lots of different approaches to finding a way into your portraits.
If you find your empty, expensive, canvas threatening, try getting your likeness on a piece of paper and then trace it to move it across afterwards.
Did you like this page?
Copyright Fiona Holt, 2024


