Painting Skin Tone

I struggled with skin colour and tone for a long time and fully admit that I am still prone to the odd **** up. It is true though that you learn far more from your mistakes than your masterpieces. When you do finally work out what’s going wrong you tend not to forget it. So here are a couple of guidance tips, that I now use myself, to help make your journey less painful than mine was!

Tone, Transparency and Saturation
-----------------------------------------------

Tip 1 Skin is Usually Brown
Certainly, specific areas of the skin and the face may well not be brown in colour. For example cheeks may have a touch of pink in them, tear ducts may have red colour in them, shadows may have any colour reflected into them. But as a general guide, the predominant flesh colour, which can be found adjacent to the highlights, is often a tertiary brown. It may be a fairly pale brown, it may be a yellow brown, an orange brown, a red brown, a chocolate brown or even a brown that is almost black in colour, but skin is rarely actually yellow, orange, red or pink etc. By this I also do not mean to imply that flesh colours are always grey and dirty. One of my fallback skin colours is a Sienna which is a beautifully radiant red brown. I often start mixing a skin colour by taking a natural earth colour like Sienna or a yellow Ochre and then adding small amounts of the less natural Cadmiums, Alizarin crimson or white to it.
Common exceptions that come to mind are the very pale Caucasian skin colours that are often accompanied by light blonde or ginger hair, and children’s skin which has seen much less sun than adult skin. If you are working opaquely then these may be mixed by adding white to e.g a Cadmium orange. If you’re working with glazes then try applying orange or pink over a very pure white ground and then immediately rub most of the colour off with a very clean cloth.
A rarer exception is when an unnatural fluorescent light is cast over the face. In this case you will have to take great care with your composition to convince your viewer to accept the skin colour. That said, if you can, it often makes for a great portrait painting.

Tip 2. Skin is Usually a Mid or Dark Tone
I dread to think how many ghosts I painted before I finally worked this out. Time and time again I have looked at a Caucasian sitter’s skin, seen that it is a pale colour in relation to their hair, and proceeded to paint them looking as though they are on their death bed. Nowadays I have finally learned that skin is frequently far closer to a mid tone than a very pale tone. If you are Caucasian, to prove this to yourself, hold a white piece of paper next to your skin right now, or failing that, next time you put an item of white clothing on take a minute to observe just how much darker your skin colour is in comparison. This should help you to understand that the ghost portrait demon most commonly rears its ugly head when there is an absence of white clothing or accessories on the model. The artist sees that the skin is the palest part of the composition and proceeds to make it too pale. Turn this scenario on its head and you have one solution to successfully painting a portrait of someone who does have very pale skin. Make sure there is a white object somewhere in the portrait and, hey presto, your subject’s skin will look warm in relation to the white object even though it is still fairly pale.
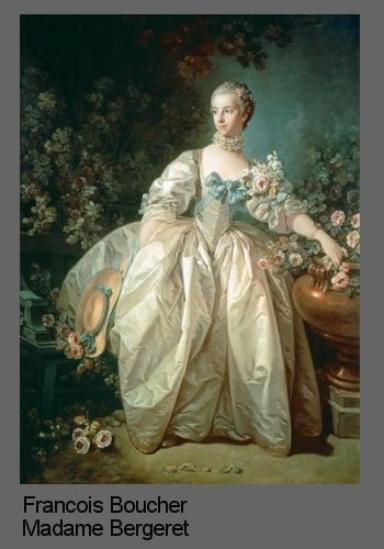
A master of painting pale skin was Francois Boucher who had a different solution to painting very pale skin tones. He would surround the model almost entirely with cool colours , frequently a pale silvery green, so that just a touch of red colour in the very pale flesh tone would be sufficient to warm it up relative to its surroundings. Gainsborough also did this too.

Join Leo on a quest to find his way home from a very mischievous house with enchanted slides, cheeky squirrels, sneaky swings, a wacky never-ending staircase and much more. In Leo’s company you’ll discover that at the end of the rainbow there is not only treasure but the greatest treasure of all.”
Ages 7-10 years.

Tip 3 Mix Your Half Tone From Your Flesh Tone
The half tones are the areas on the lit side of the shadow edge but only receiving light obliquely rather than directly. If you are struggling to find a convincing suite of flesh tones and need guidance, try mixing your half tone by taking your main flesh tone and then adding a lick of the colour that you are going to use for your deepest shadows.

Summary
The main skin colour of the face, which can be found adjacent to a highlight, is usually a yellow, orange, red, pink or chocolate tertiary brown rather than a pure primary or secondary colour. Skin colour is also frequently a dark or mid tone rather than a very light tone. To get the correct skin tone, hold a piece of white paper up in front of your sitter before starting their portrait. To tie your skin tones together try mixing your half tone from your main flesh tone and your shadow colour.
Did you like this page?
Copyright Fiona Holt, 2024


